Step 1
Open a new document in Adobe Photoshop with the size 500x500 pixels and a white background.
Create an ellipse using the ellipse tool. You can find it in the Tools Tab, Ellipse Tool (U):

Draw an ellipse like here:

Step 2
Now we’re going to apply a few effects on this ellipse. First we’re going to apply the “Drop Shadow Effect”. To do this step select Layer > Layer Style > Drop Shadow or click on the icon Add Layer Style in the Layers Tab bottom. Use the next settings for this effect:

Step 3
Apply the Layer > Layer Style > Inner Shadow effect using for this the next settings:

Step 4
Now select Layer > Layer Style > Inner Glow with the settings:

Step 5
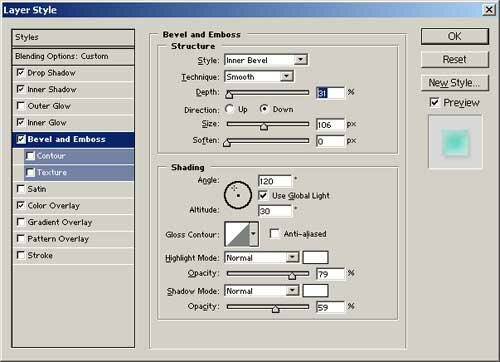
Apply Layer > Layer Style > Bevel&Emboss. Use the next settings when applying the effect:

Step 6
The final effect is “Color Overlay”. Select Layer > Layer Style > Color Overlay. Use the settings:

This is our intermediary result after these steps:

Step 7
Draw an ellipse like here (use the Ellipse Tool; you can find it in the Tools Tab) and make a selection using the Elliptical Marquee Tool (M):

Select Select > Inverse and press the DELETE key to delete the selected area:

For this layer, set the opacity to 20% in the Layers Tab.
Step 8
Draw another ellipse like in the next picture. To do this check the step 7:

Set the “Opacity” in the Layers Tab to 20%:

Step 9
With a “Soft Rounded Brush 180 Px” delete the top side of the new ellipse like here and you have a nice “glass orb” for your multimedia buttons:

Filed under Photoshop Tutorials

