Step 1
Create a new document in Adobe Photoshop with a blue background (#336699). Select the Horizontal Type Tool in the Tools Tab and type an “O” like in the next picture:

Step 2
First, “rasterize” the layer which contains the letter “O”. Select the Magic Wand Tool in the Tools Tab and select white color on the stage like here:

Step 3
Apply the feather effect on the selection, using the 6px feather radius, and delete de selected area using the DEL key:

Step 4
Duplicate the layer which contains the “O” (right click in the Layers Tab on the layer and choose Duplicate
Step 5
With a “Soft Round 465 pixels” brush, delete the area on the top of the new layer. The result should be something like this:

Step 6
On a new layer type a new “O” with white color and “rasterize” the new layer like on the step 2. Use the Magic Wand Tool to select the white zone on the new layer. Choose Select > Feather and set the feather radius to 30 pixels. Use the DEL key to delete the selected area. This should be your result:

Step7
Duplicate the layer again and set the color overlay effect on the new layer. To do this step select Layer > Layer Style > Color Overlay, and using the next settings apply the effect:

Step 8
Delete the bottom side of the new layer using the “Soft Rounded 465 pixels” brush. This is an intermediary result:

Step 9
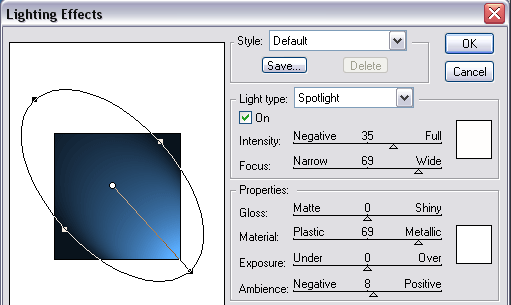
Select the layer “background” in the Layers Tab and apply the lighting effect on it. To do this select Filters > Render > Lighting Effects. Use the next settings when you apply this effect:

Step 10
Add other elements if you want. This is my result:

Filed under Photoshop Tutorials

